Free templateWater cycle diagram
The water cycle
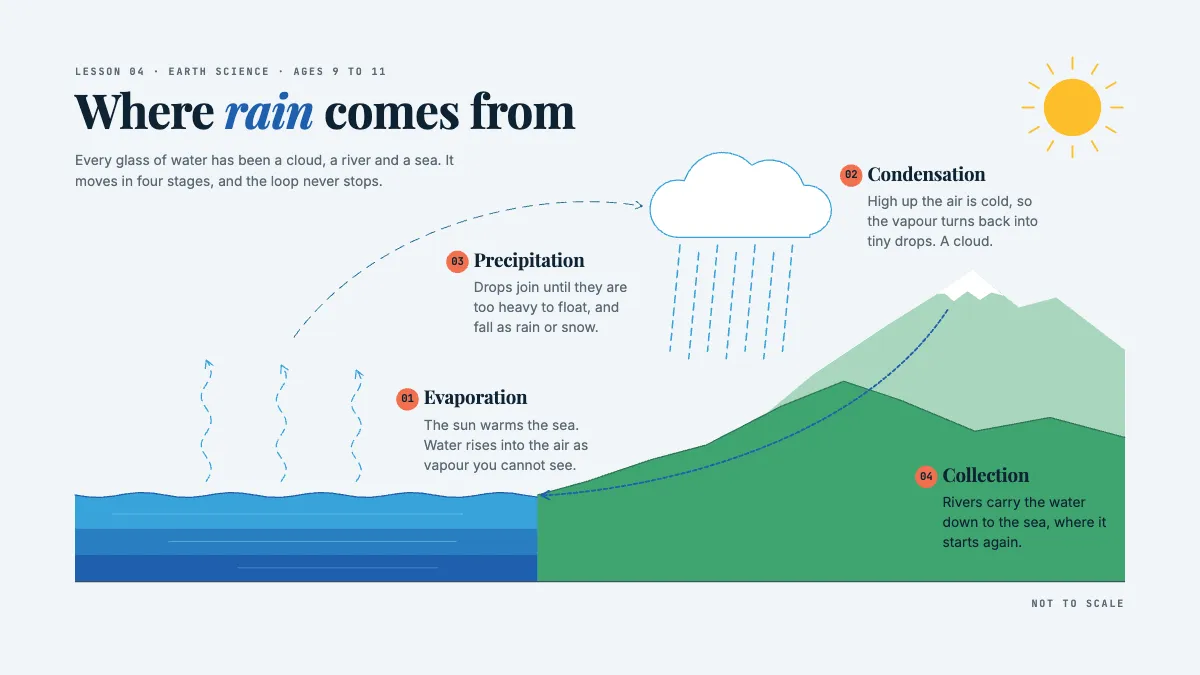
A lesson slide drawn as a cross-section of sea and mountain: four stages where they happen, with rain and rivers that move.
Free. It opens in the Motionix editor as your own copy.
Download the pictureWebP, 1200 × 675, free to use. To change the words or colours, open it in the editor.
- Size
- 1920 × 1080 px
- Pages
- 1
- Motion
- Yes, plays live and in GIF or video
- Category
- Lessons
What it shows
- Annotated figure
- Flowing rain and river
- Builds stage by stage
Good for
How to use it
- Open the template. It becomes a project in your account.
- Change the words, colours and pictures. Every part is an ordinary shape, line or text box.
- Press Play to watch it build, then present it or export it.
What is a water cycle diagram?
A water cycle diagram shows how water moves between the sea, the air and the land in a loop with no start or end. Most diagrams for schools name four stages, evaporation, condensation, precipitation and collection, and draw each one where it happens: over the sea, in the clouds, on the hills and in the rivers.
When it helps
- Introducing the water cycle to pupils aged 7 to 11 before they meet the vocabulary in a text.
- Revising states of matter, since every stage is water changing between liquid and gas.
- Explaining floods, droughts or where tap water comes from in a geography unit.
- A labelled diagram to fill in, with the stage names removed, as a quick end-of-lesson check.
Tips
- Show the stages in the order you will teach them; revealing all four at once makes pupils read the labels instead of following the loop.
- Add transpiration from plants and run-off over the ground for older pupils; leave them out at primary level so the loop stays clear.
- Colour water as liquid and water as vapour differently, so the change of state is visible, not only written.
How to draw the water cycle
Draw the landscape first
Sketch the sea on one side and a hill or mountain on the other, with a river running between them. The cycle needs places to happen in.
Add the sun
Place the sun above the sea. Its heat drives evaporation, so pupils should see the two side by side.
Mark the four stages
Label evaporation rising from the sea, condensation as a cloud, precipitation falling on the hill, and collection in the river and the sea.
Join them with arrows
Draw one arrow from each stage to the next so the loop closes back at the sea. Arrows that go one way only are what make it a cycle.
Write one line per stage
Under each label, say what changes in plain words, for example "vapour cools into tiny drops". Keep each line short enough to read from the back of the room.
FAQQuestions
Common questions.
What are the 4 stages of the water cycle?
Evaporation, when the sun warms water and it rises as vapour; condensation, when the vapour cools into the droplets that make clouds; precipitation, when the droplets fall as rain, snow or hail; and collection, when the water gathers in rivers, lakes and the sea before evaporating again.
What powers the water cycle?
Energy from the sun. It heats water so it evaporates, and gravity brings it back down as precipitation and pulls it downhill through rivers to the sea.
Is the water cycle the same as the hydrological cycle?
Yes. Hydrological cycle is the scientific name. Diagrams for older students often add more stages to it, such as transpiration, infiltration, run-off and groundwater flow.
More lessons templates
Concepts, processes and revision pages for classrooms and courses.